4 min read
5 Steps to Creating an Evaluation Platform Using the RTI Field Build Kit
.jpg) Patrick (PK) Keliher
:
February 14, 2019
Patrick (PK) Keliher
:
February 14, 2019

Antonio Garcia, a Senior Member of the Technical Staff at Wind River, approached me to ask about running our Connext® DDS Professional for a demonstration at the Future Airborne Capability Environment (FACE™) Technical Interchange Meeting (FACE TIM). The requirement for the demo platform was Wind River Linux 8 on a 64-bit Intel Architecture device. While RTI supports Wind River® Linux, specifically Wind River Linux 7, the next version of their operating system wasn’t yet validated. With the event only a month away, Wind River was faced with the possibility of not being able to build their demo in time.
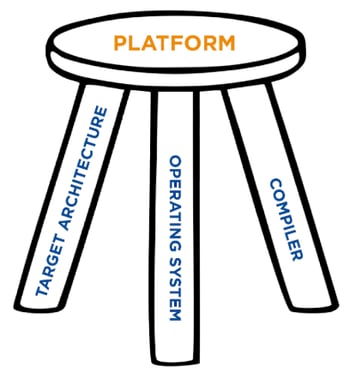
Before solving the Wind River Linux 8 problem, a brief explanation of a Connext DDS Professional-validated platform is useful. There are three parameters that define a Platform: target CPU architecture, operating system and compiler.

Figure 1. The Three Legs of a Platform
Each platform’s filename specifies the three parameters for simplicity. Let’s look at a few of our evaluation platforms (available at https://www.rti.com/downloads):
- rti_connext_dds-5.3.1-eval-i86Linux2.6gcc4.4.5.run
This supports 32-bit Intel Architecture, running a Linux 2.6-based kernel, with gcc 4.4.5.
- rti_connext_dds-5.3.1-eval-x64Linux3gcc5.4.0.run
This supports 64-bit Intel Architecture, running a Linux 3-based kernel, with gcc 5.4.0.
- rti_connext_dds-5.3.1-eval-x64Win64VS2017.exe
This supports 64-bit Intel Architecture, running Windows 64-bit, with Visual Studio 2017.
The validation process for a new platform can be complex. Depending on what optional features and services are required, it might take several weeks. Fortunately for the FACE TIM demonstration, porting the new Wind River Linux 8 platform would leverage experience from previous Wind River Linux platform porting and validation efforts.
For evaluations and demonstrations, RTI maintains a CMake-based Field Build environment in a GitHub repository. An RTI Field Application Engineer will typically work with the customer to generate a field build for the desired evaluation platform. In this case, Wind River had the experience to create their Wind River Linux 8 platform on 64-bit Intel Architecture themselves. The skills necessary to use the Field Build kit are:
- Experience building and porting software
- Familiarity with Make, CMake, Premake or Autoconf
- Knowledge of the applicable compiler, compiler options and linker options
- Basic understanding of Connext DDS
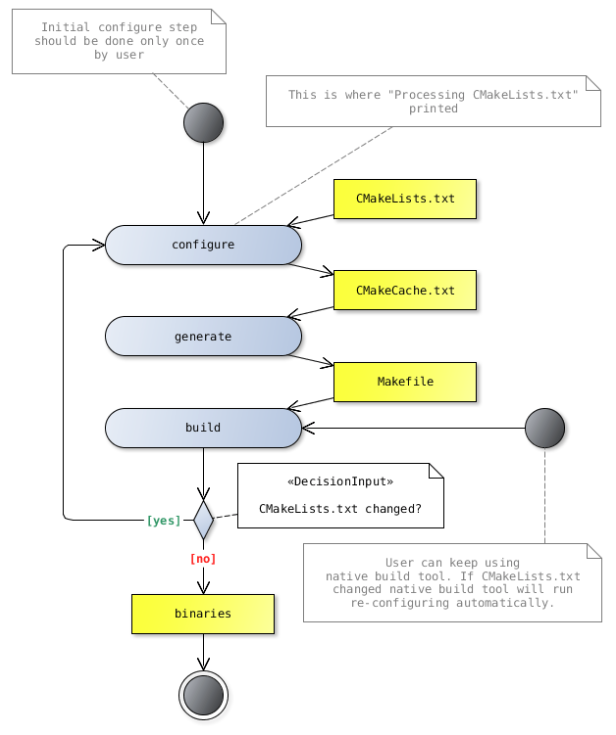
The Field Build kit utilizes CMake to develop the Makefiles for the desired platform configuration. For those unfamiliar with CMake, the description from CMake.org is a great place to start.
CMake is an open-source, cross-platform family of tools designed to build, test and package software. CMake is used to control the software compilation process using simple platform- and compiler-independent configuration files, and to generate native makefiles and workspaces that can be used in the compiler environment of your choice.
In addition to standard documentation, a useful site with an awesome name is The Hitchhiker’s Guide to the CMake. It is quite thorough and contains detailed information and tutorials.

Figure 2. CMake Flowchart
Using the Field Build kit, Wind River configured the CMake environment and successfully built the Wind River Linux 8 platform in just a few days. They developed a standalone detailed process document to facilitate any potential future Wind River operating system platform builds. Excerpts from the document are included inline below.
The Field Build GitHub repository contains a Readme file with the step-by-step instructions. The major steps are:
- Resolving Dependencies
- Configuring CMake
- Building Connext DDS
- Testing RTI Connext DDS
- Installing RTI Connext DDS
We’ll go through an overview of the instructions here, illustrated with the Wind River example.
1. Resolving Dependencies
Wind River has detailed steps to configure and build the operating system to include unixodbc.
Create a platform project that includes SDK support and internet download support.
…
Build the platform project:
make fs
On Linux you will have to install unixodbc-dev for Debian-based system like Ubuntu, or unixODBC and unixODBC-devel on Fedora-based distributions such as CentOS.
In a separate location, clone the meta-openembedded repository and copy the unixodbc recipe to your platform project:
…
Add the unixodbc package, then rebuild the file system and create the SDK:
cd $(PRJ_DIR)
make –C build unixodbc.addpkg
make fs
make export-sdk
Install the SDK.
…
Once the SDK has completed installation, the next step will be cloning the RTI Connext DDS repository:
git clone https://github.com/rticommunity/rticonnextdds.git
2. Configuring CMake
The field build distribution of the Connext DDS source code includes a number of CMake scripts that can be used to generate build constructs, such as Makefiles or Visual Studio solutions.
To generate the build constructs in the working directory using the default settings for your environment run:
cmake /path/to/rticonnextdds
For many environments, configuring CMake is incredibly simple. For a standard Linux/gcc environment, all that is required is the path to gcc. Cross-compilation environments are also quite straightforward to configure.
The WR Linux 8 CMake configuration looks like this:
set(CMAKE_SYSTEM_NAME Linux)set(CMAKE_SYSROOT /opt/wrlx8_sdk/sysroots/corei7-64-wrs-linux)set(CMAKE_C_COMPILER /opt/wrlx8_sdk/host-cross/usr/bin/x86_64-wrs-linux/x86_64-wrs-linux-gcc)set(CMAKE_C_COMPILER_AR /opt/wrlx8_sdk/host-cross/usr/bin/x86_64-wrs-linux/x86_64-wrs-linux-gnux32-gcc-ar)set(CMAKE_C_COMPILER_RANLIB /opt/wrlx8_sdk/host-cross/usr/bin/x86_64-wrs-linux/x86_64-wrs-linux-gnux32-gcc-ranlib)set(CMAKE_CXX_COMPILER /opt/wrlx8_sdk/host-cross/usr/bin/x86_64-wrs-linux/x86_64-wrs-linux-g++)set(CMAKE_CXX_COMPILER_AR /opt/wrlx8_sdk/host-cross/usr/bin/x86_64-wrs-linux/x86_64-wrs-linux-gnux32-gcc-ar)set(CMAKE_CXX_COMPILER_RANLIB /opt/wrlx8_sdk/host-cross/usr/bin/x86_64-wrs-linux/x86_64-wrs-linux-gnux32-gcc-ranlib)set(CMAKE_FIND_ROOT_PATH_MODE_PROGRAM NEVER)set(CMAKE_FIND_ROOT_PATH_MODE_LIBRARY ONLY)set(CMAKE_FIND_ROOT_PATH_MODE_INCLUDE ONLY)set(CMAKE_FIND_ROOT_PATH_MODE_PACKAGE ONLY)
3. Building Connext DDS
Once you have generated the makefiles, solutions or projects via CMake, you can use them to build Connext DDS. If you created Makefiles for building Connext DDS, you can simply run make from the working directory. Likewise, if you created a Visual Studio solution, you can double-click on rticonnextdds.sln and build the libraries from Visual Studio C++.
Alternatively, you can use the cmake command to invoke the build scripts in an environment-independent way, by running the following command from the directory where the build constructs were generated:
cmake --build .
This build step is quite simple and is described in the Wind River process as follows:
Now, all that is left to do is build your libraries:
cmake -DCMAKE_TOOLCHAIN_FILE=wrlx8.cmake .
cmake --build .
The new build libraries will be located under build/lib/x64Linux.
4. Testing Connext DDS
This repository contains simple tests that perform a sanity check of the build. These tests provide very little code coverage and are not a valid substitute of unit tests and integration tests.
5. Installing Connext DDS
You can install the results of your build invoking make install or the INSTALL target of the generated Visual Studio solution. By default, the results of your copy will be installed under /usr/local on Unix and .
For completeness, the command is:
make install
Conclusion
Using the RTI Field Build capability, Wind River was able to successfully build DDS libraries for their demo platform in just a few days ensuring their demo was ready in time for the FACE TIM. The lack of an already-validated platform for a desired configuration shouldn’t discourage anyone from choosing Connext DDS Professional for a demonstration or an evaluation. Customers and RTI partners can utilize the Field Build kit to quickly prove the value and use case, and then engage with RTI to add the configuration to our always-growing list of validated platforms.
For more information on FACE, we have a variety of information including a recent blog: https://www.rti.com/blog/connecting-the-pieces-integrating-face-conformant-portable-component-with-a-simulation-environment
Posts by Tag
- Developers/Engineer (180)
- Technology (79)
- Connext Suite (77)
- News & Events (75)
- 2020 (54)
- Aerospace & Defense (52)
- Standards & Consortia (51)
- Automotive (38)
- 2023 (34)
- 2022 (29)
- IIoT (27)
- 2025 (25)
- Leadership (24)
- Healthcare (23)
- 2024 (22)
- Connectivity Technology (21)
- Cybersecurity (20)
- 2021 (18)
- Culture & Careers (15)
- Military Avionics (15)
- FACE (13)
- Connext Pro (10)
- JADC2 (10)
- ROS 2 (10)
- Connext Tools (7)
- Connext Micro (6)
- Databus (6)
- Transportation (5)
- Case + Code (4)
- Connext (4)
- Connext Cert (4)
- Energy Systems (4)
- FACE Technical Standard (4)
- AI (3)
- Oil & Gas (3)
- Research (3)
- Robotics (3)
- #A&D (2)
- Connext Conference (2)
- Edge Computing (2)
- Golden Dome (2)
- MDO (2)
- MS&T (2)
- RTI Labs (2)
- TSN (2)
- ABMS (1)
- C4ISR (1)
- DOD (1)
- ISO 26262 (1)
- L3Harris (1)
- LabView (1)
- MOSA (1)
- MathWorks (1)
- National Instruments (1)
- Simulation (1)
- Tech Talks (1)
- UAM (1)
- Videos (1)
- eVTOL (1)
 Success-Plan Services