Track and Monitor Vehicles and Assets
High Throughput and Low Latency with Connext

Introduction
RTI Connext is peer-to-peer middleware that fits the requirements of high-performance vehicle monitoring and radar tracking systems. Connext lets you fine-tune data streams for your network, and trade off latency and throughput – all through configuration. So, you can get the performance and scalability that you need without changing your source. This allows you to send updates about many vehicles, and to tune your system for sending those updates at very high rates.
This use case applies if you need to distribute vehicle location or radar track data to:
- Air traffic control systems
- Situational awareness systems
- Nextgen air traffic management systems
- Warning systems
- Self-defense systems
- Area defense systems
- Battlefield awareness
- Logging systems
- Collision avoidance systems
- Emergency vehicle tracking systems
- Rail tracking systems
- Bus and transport applications
The following sections show coding examples of how Connext can be used in applications that send flight data. However, the patterns we examine here are not just specific to air traffic control systems – an emergency vehicle tracking system has some of the same basic requirements as an air traffic control system. The key to each of these systems is that they need to represent many unique vehicles, and send updates about them frequently.
-
Connext in Vehicle Tracking and Radar Applications
Connext is the core communication infrastructure in a variety of vehicle tracking and radar systems – from air traffic management to area defense systems. Connext provides near-real-time performance, flexible tuning through quality of service (QoS), and simple deployment due to automatic discovery of data and services. In addition, Connext allows you to make tradeoffs to decide which aspect of performance is most important for your application: Do you need the maximum throughput available in order to send updates about many vehicles? Do you need minimum latency for your collision-avoidance system to make timely decisions? In addition, Connext supports large-scale systems – allowing updates of tens or even hundreds of thousands of vehicles.
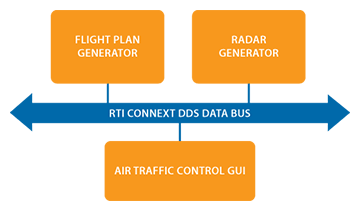
This example shows a simple air traffic management example, with a radar that is sending track updates, a flight plan publisher that is providing flight plans, and a UI that is showing the aircraft as they land. As we guide you through this example, we will talk about the architecture, the code, and the configuration. You can build the examples yourself to look at the source code, or if you are only interested in configuration, you can run the pre-built applications and look at just the XML configuration.
-
What This Example Does
This example shows three applications. You can run them on the same machine or separate machines in the same network. This example shows radar tracks, but the concepts and the quality of service (QoS) tuning are also applicable for other vehicle-tracking use cases. There are minor differences in the data model between vehicle tracking use cases, described in the section "Data Model Considerations."
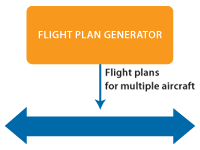
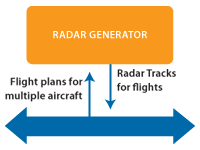
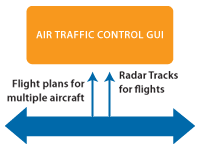
The three applications are:
-
Running the Example
Download the Example
Download the example files [ Linux | Windows ] and extract them into a location of your choice. We'll refer to this location in this document as EXAMPLE_HOME.
To view and download the example source code without pre-built executables, visit the RTI Community DDS Use Cases repository
in GitHub.This download includes:
- Pre-built example applications you can configure and run without rebuilding
- Example source and CMake files for Windows and Linux
Download RTI Connext
If you do not already have RTI Connext Professional installed, get Connext for free. Your download will include the libraries that are required to run the
example, and tools you can use to visualize and debug your distributed system.Run the example
On Windows systems, navigate to the EXAMPLE_HOME\ExampleCode\scripts directory. In this directory, there are three separate batch files to start the applications. These are called:
- FlightPlanGenerator.bat
- RadarGenerator.bat
- TrackGui.bat
On Linux systems, navigate to the EXAMPLE_HOME/ExampleCode/scripts directory. In this directory, there are three separate script files to start the applications:
- FlightPlanGenerator.sh
- RadarGenerator.sh
- TrackGui.sh
The scripts and executable have been tested on:
- Windows Visual Studio 2017 32 and 64 bit
- Ubuntu 16.04
- Unbuntu 18.04
You can run these script or batch files on the same machine, or you can copy this example and run on multiple machines. If you run them on the same machine, they will communicate over the shared memory transport. If you run them on multiple machines, they will communicate over UDP.
Notice how you can see track data and flight-plan information in the air traffic control GUI. If you are running all the applications on a single machine, this data is being sent over shared memory.
If you have access to multiple machines on the same network, start running these applications on separate machines. Note: If you do not have multicast on your network, see the section Run the Example with No Multicast for details on how to change the configuration to run without multicast.
Configure Throughput and Latency for Your Requirements
Individual vehicle or radar tracking applications within a distributed system will have different requirements for data latency or throughput. A collision-avoidance system or a self-defense system may have strict requirements for low latency. A recording or logging system may need to record a high throughput of vehicle position or radar track data, but may not need to receive it with the low latency of your other applications.
RTI Connext allows you to tune Quality of Service (QoS) parameters in an XML format. This allows you to separate your application logic from your network capabilities and rapidly reconfigure your application for new deployment scenarios.
This example shows you how to configure your application to maximize throughput at the expense of latency, or minimize latency at the expense of throughput.
Run the Example with Increased Throughput and Increased Latency
By default, the radar generator application runs with the lowest possible latency. To run it with increased throughput at the expense of latency, use the following parameter:
scripts\RadarGenerator.bat --high-throughput
You can also increase the number of tracks it sends at startup, how often it should create new tracks, the maximum number of tracks it can send at once, and how fast it should update:
--start-tracks [number]
Number of tracks the generator should generate at startup
--max-tracks [number]
Maximum tracks the generator sends at once
--run-rate [number]
Run in real time, faster, or slower. At default rate, all tracks are updated every 100ms. If you set this to 2 the generator will run twice as fast, updating all tracks every 50ms.
--creation-rate [number]
How fast to create new tracks.
Run Multiple Radar Generators
The RadarGenerator application is acting as a unique sensor that updates radar positions. As we will discuss later in the Data Model Considerations section, each RadarGenerator application needs a unique ID. So, if you run more than one RadarGenerator application, you should run with the option:
scripts\RadarGenerator.bat --radar-id [number]
Run the Example with No Multicast
If your network doesn't support multicast, you can run this example using only unicast data. The two steps you must take to run with only unicast are
- Run all three applications with the parameter --no-multicast. This causes the
applications to load the .xml files that do not depend on multicast in the network. - Edit the base_profile_no_multicast.xml file to add the address of the machines that you want to contact. These addresses can be valid UDPv4 or UDPv6 addresses.
<discovery>
  <initial_peers>
    <!-- !!!!!!!!!!!!!!!!!!!!!!!!!!!!!!!!!!!!!!!!!!!!!! -->
    <!-- Insert addresses here of machines you want     -->
    <!-- to contact                                     -->
    <!-- !!!!!!!!!!!!!!!!!!!!!!!!!!!!!!!!!!!!!!!!!!!!!! -->
    <element>127.0.0.1</element>
    <!-- <element>192.168.1.2</element>-->
  </initial_peers>
</discovery>
Windows Demo Video
How to run the Air Traffic Control Example on Windows
-
Building the Example
Directory Overview
EXAMPLE_HOME
|-- Docs
`-- ExampleCode
    |-- resources
    |-- build
    |-- scripts
    `-- src
        |-- Config
        |-- Generated
        |-- Idl
        `-- . . .
The source code is divided into:
- resources
- Build - build directory for CMake to build the sources. This is also where the executables will be located.
- scripts - Scripts to run applications
- src - Source code
- Config - XML QoS configuration files
- Generated - Source files generated from Idl
- Idl - Describes the data types that are sent over the network
- Other directories - Source code for specific applications.
Building the Example
On all platforms, the first thing you must do is set an environment variable called NDDSHOME. This environment variable must point to the RTI Connext installation directory. For more information on how to set an environment variable, please see the RTI Core Libraries and Utilities Getting Started Guide.
Windows Systems
Open a Windows Command Prompt shell and change the working directory to
EXAMPLE_HOME\ExampleCode create a build directory
Mkdir buildChange to the build directory
cd buildRun CMake to generate the build files
cmake -G "Visual Studio 15 2017" -Ax64 ..Build the example
cmake --build .Linux Systems
Open a Windows Command Prompt shell and change the working directory to
EXAMPLE_HOME\ExampleCode create a build directory
Mkdir buildChange to the build directory
cd buildRun CMake to generate the build files
cmake -G "Visual Studio 15 2017" -Ax64 ..Build the example
cmake --build .
-
Under the Hood
Data Model Considerations
When modeling data in DDS, one of the biggest considerations is "what represents a single element or real-world object within my data streams?" In the case of vehicle tracking, you can generally assume that each vehicle should be represented as a unique object. In this example, we are modeling our data types in the file AirTrafficControl.idl. Connext uses IDL – the Interface Definition Language defined by the OMG – to define language-independent data types. More information about IDL can be found in the RTI Connext Users' Manual.
In DDS, these unique real-world objects are modeled as instances. Instances are described by a set of unique identifiers called keys, which are denoted by the //@key symbol.
So, in our example, we use a trackId as a key field:
long trackId; //@key
There is one wrinkle to our assumption that each vehicle should be represented as a unique object: What if the same vehicle is being tracked by multiple sensors?
Often you want to maintain updates from each sensor separately. In DDS, this means that instead of each vehicle being the unique real-world object, the combination of the vehicle and the sensor becomes the unique real-world object. To support this, the sensor ID also becomes a key field:
long radarId; //@key
long trackId; //@key
If you can assume that there is one sensor per vehicle, such as a GPS that is updating the position of an emergency vehicle, you do not need to worry about a sensor unique ID being part of the data. In that case, the instance is the vehicle.
Configuration Details: XML Configuration for Radar Throughput
Since a major component of building a radar or vehicle-tracking system is performance tuning, we'll talk about that first, before going into too much detail about the code itself.
The source code loads a series of XML files that it uses to configure the delivery and resource characteristics for the data. The .xml files are in the Config directory; they specify the communication characteristics for the data, such as whether the data is reliable. XML QoS profiles can inherit from each other.
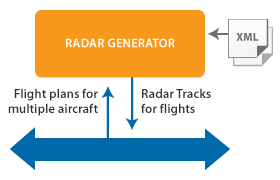
Multicast
Multicast is enabled in the multicast_base_profile.xml file.
In the example, this is encapsulated in a QoS profile called "OneToManyMulticast." This is disabled by default, because some wireless networks experience high traffic when sending high-throughput multicast data. However, if your network supports it, you can get much higher one-to-many throughput by uncommenting this section. The other QoS profiles inherit from this profile.
<qos_profile name="OneToManyMulticast">
   <datareader_qos>
     <!-- Uncomment this to enable user data over multicast.  This is
          commented out for systems that do not have multicast, or
          with switches that block some multicast traffic -->
     <!--<multicast>
       <value>
         <element>
           <!- - Must be a valid multicast address - ->
           <receive_address>239.255.5.1</receive_address>
         </element>
       </value>
     </multicast> -->
  </datareader_qos>
</qos_profile>
Batching
Batching small data enables throughput at the expense of latency. The Radar's default profile "LowLatencyRadar" does not use batching. Batching is enabled in the "HighThroughputRadar" configuration.
<batch>
  <enable>true</enable>
  <!-- If the batch hits 1024 bytes, flush to the network -->
  <max_data_bytes>1024</max_data_bytes>
  <!-- You can decide on the maximum amount of additional latency
       you are willing to sacrifice for better throughput. -->
  <max_flush_delay>
    <sec>0</sec>
    <nanosec>200000000</nanosec>
  </max_flush_delay>
</batch>
Hands On: Viewing the Application using Tools
To get an idea of what these applications are creating, you can use the RTI Administration Console (Admin Console) tool to see:
- What topics they are sending and receiving on the network
- What the structure of the applications' data looks like
This video shows how to get started using Admin Console and how to view your data types.
Video Example
Viewing the Air Traffic Control Example applications with the RTI Admin Console tool.
-
RadarGenerator (C++)
This application sends and receives data over the network. The code to create the application's DDS interface is in the class RadarInterface. This class is composed of two objects:
- RadarWriter
- FlightPlanReader
The RadarWriter class is a wrapper around a DDS DataWriter that sends radar data. The FlightPlanReader class is a wrapper around a DDS DataReader that receives flight plan data.
Sending Data
The application publishes the track data in the PublishTrack() call. The RTI Connext call that actually sends data over the network is:
_trackWriter->write(track, handle);
This call accepts the data that will be sent over the network, and a handle to the data. In this example, we pass in a NIL handle. However, you can get better performance in some cases by pre-registering your data and using the handle.
The application publishes a track drop message in the DeleteTrack() call. It does this by calling:
_trackWriter->dispose_instance(handle);
Radar Data Model - Data Type
Radar is modeled in the AirTrafficControl.idl file. RTI Connext uses IDL – the Interface Definition Language defined by the OMG – to define language-independent data types. More information about IDL can be found in the RTI Connext Users' Manual.
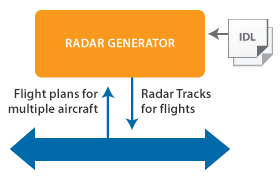
The radar data type is:
struct Track {
  long radarId; //@key
  long trackId; //@key
  . . .
};
This is modeled as very simple data, with only a few fields. The most important thing to notice is that the track ID and a radar ID are marked with the tag //@key. This indicates that these IDs make up the unique identifier of an individual track. The flight ID may or may not be available when the track is created, so it is not part of the unique ID of a track. By marking the unique identifiers of a track as key fields, we are telling the middleware that these are unique as instances.
By telling the middleware that we are representing unique real-world objects within our Topic, we allow the middleware to do smart things with our data, such as keeping a separate cache for each of our unique objects. This will be covered more in the section Radar Data Delivery Characteristics (QoS).
More information about uniquely identifying elements of your data can be found in this best practices document.
The data also has a latitude, longitude, and altitude. We could optionally add more fields, such as bearing and speed.
Radar Data Model - Topic
The radar data can be represented as a single Topic. It is a best practice to define the Topic name inside your XML or IDL because the Topic name is part of the interface.
const string AIR_TRACK_TOPIC = "AirTrack";
Radar Data Delivery Characteristics (QoS):
By default, radar data is sent rapidly, so it could potentially be sent without reliability enabled. However, it is important that the receiving application receives the last update of each track.
To support this, we have enabled reliability in this example, combined with a history depth of 1. As we discussed above, each track is modeled as a unique instance. Modeling data as instances in combination with reliability and a history depth of 1 means that:
- The application has a single space in its queue for each radar track, and
- It will reliably deliver whatever is currently in each space in its queue.
By doing this, we ensure that the last piece of data that is sent (the last update or the drop message) will be delivered. The Reliability and History QoS are enabled in XML. Note that these settings must be enabled on both the DataWriter and the DataReader to ensure reliable delivery.
<reliability>
  <kind>RELIABLE_RELIABILITY_QOS</kind>
</reliability>
<history>
  <kind>KEEP_LAST_HISTORY_QOS</kind>
  <depth>1</depth>
</history>
Beyond this, the radar data is tuned for low-latency, high-throughput data. As described above, in this example we can further increase throughput at the expense of latency by enabling batching.
-
Flight-Plan Generator (C++)
This application sends flight-plan data over the network, and is the simplest of the three applications in this example.
The code to create the application's DDS interface is in the class FlightPlanPublisherInterface. This class is directly responsible for writing data.
Flight-Plan Data Model Overview
The flight plan is modeled in DDS as Occasionally Changing State Data, which has the following characteristics:
- It is updated only when the state of some object changes-in this case, the flight plan, which may be published or updated according to conditions
- That object's state is not constantly changing
- Other applications want to know the current state of each object—even if it was published before they started up
Flight-Plan Data Model - Data Type
The data type is modeled in the AirTrafficControl.idl file. You can see this data type using the Analyzer tool. The FlightPlan data type is more complex than the Track data type, including enumerations, strings, and a sequence of alternate aerodromes.
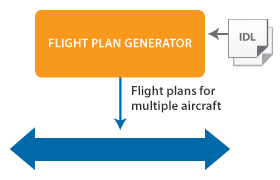
struct FlightPlan
{
  // Up to seven characters that represent the unique flight ID
  FlightId flightId; //@key

  // flight rules (enumeration)
  FlightRulesKind flightRules;

  // type of flight (enumeration)
  FlightTypeKind flightType;

  ...
};
State data represents the state of some element or object in the real world - in this case, the flight plan for a particular flight. In DDS, real-world objects are modeled as instances.
Instances are described by a set of unique identifiers called keys, which are denoted by the //@key symbol. In this case, the key is the unique flight identifier – a string with a maximum of seven characters that includes the airline ID and the flight number.
-
Air Traffic Control GUI (C++)
The GUI application receives flight plans from the flight-plan generator and receives radar tracks from the radar generator. It uses two DDS DataReaders to receive the data. The Air Traffic Control GUI is built with a model-view-presenter design. The model is received from the network and the view is the GUI that displays the data. The presenter is responsible for taking the data from the model, converting it to objects the GUI understands, and notifying the GUI when the model has changed.
Receiving Track Data
This application does not need the lowest-possible latency, so the presenter periodically polls for updates by calling:
reader->GetCurrentTracks(&tracks);
The GetCurrentTracks() call will retrieve all the track data currently in the TrackDataReader's queue by calling the RTI Connext API:
dds::sub::LoanedSamples<com::atc::generated::Track> samples =
    _reader.select().state(dds::sub::status::DataState(
          dds::sub::status::SampleState::any(),
          dds::sub::status::ViewState::any(),
          dds::sub::status::InstanceState::alive())).read();
This call retrieves the "alive" tracks from the TrackDataReader's queue, but leaves the data in the queue instead of taking it out.
After processing the "alive" tracks, the application retrieves the "not alive" (deleted) track instances, and it removes them as it processes them:
samples = _reader.select().state(dds::sub::status::DataState(
   dds::sub::status::SampleState::any(),
   dds::sub::status::ViewState::any(),
   dds::sub::status::InstanceState::not_alive_no_writers() |
   dds::sub::status::InstanceState::not_alive_disposed())).take();
-
Next Steps
If you want to experiment further, you can use the Record/Replay tool to record live track data and replay it later. This is useful in a real system because it allows you to:
- Record what is happening in your distributed system to post-process the data and look for anomalies.
- Record and replay live data to test against real-world scenarios.
- Stress test your system by replaying data faster than it was originally recorded.
Video Example
Using the Record and Replay tools to record and replay air traffic control data.
-
Join the Community
Post questions on the RTI Community Forum.
Contribute to our Case + Code examples on RTI Community GitHub using these instructions.
 Success-Plan Services